In This Article

I have used Anki for years. It is a very popular and powerful program with an active community. Although one of Anki’s most useful features is the ability to download study material created by others in the community, you will probably want to create your own study materials. You can do so by creating new entries directly in Anki, but if you are like me, you might prefer keeping a spreadsheet that you can then import into Anki.
In this article I will show you not just how to create an Anki deck from a spreadsheet but also offer some useful information and tips about Anki and show you a way to setup a useful spreadsheet format.
Understanding How Anki Works
Anki is a great program and it is free (except for iOS, which costs $24.99). Its biggest problem is usability, especially when trying to create your own study material. The way Anki works is actually very logical. The problem is that logic is not intuitive. So, to get more comfortable creating your own content, it really helps if you understand how Anki functions.
To understand Anki you need to understand Cards, Decks, and Note Types.
A Card is like a flashcard, with the question on one side and the answer on the reverse side. A Deck is a collection of Cards. That is pretty straightforward. The confusing part is how Anki manages these Cards and Decks. The key to understanding that is the Note Type.
Cards
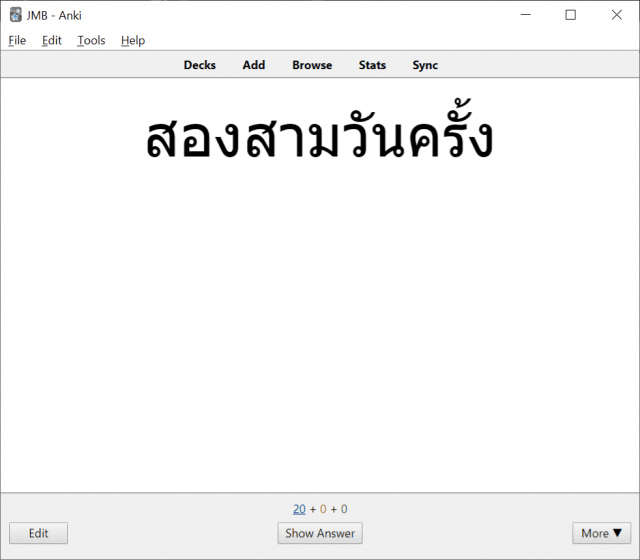
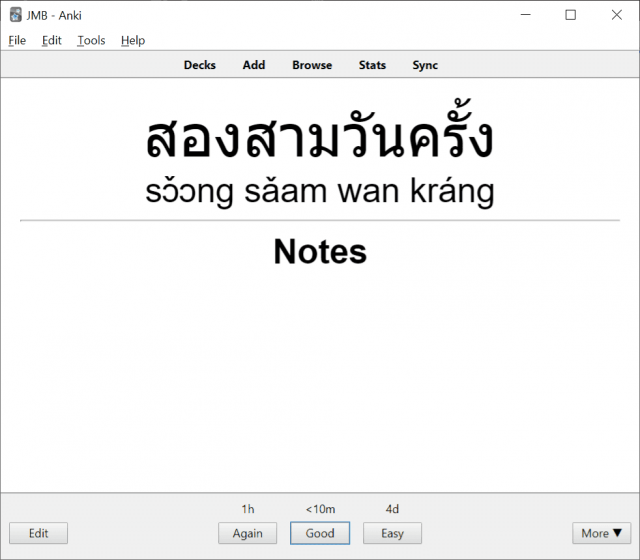
Unfortunately, the way Anki thinks about and treats Cards is confusing.
On the one hand, a Card is simply an individual flashcard we will use to study. On the other hand, Anki also uses the word Card to refer to the design (layout) of those flashcards.
Things are further complicated by the fact that there isn’t a one-to-one correlation between a Card and the rows in our Google Sheets spreadsheet. When we import that sheet, Anki creates at least one Card for each row, but creating multiple different cards for that same row is also common.
Why do things this way? Let’s explain with an example.
Currently, I am studying Thai (see my monster list of Thai language resources). I can study my vocabulary in at least three ways:
- English meaning of the Thai word on the front card
- Thai word written in Thai script on the front
- Transliterated Thai word on the front
So, I will want three different Cards (flashcards). But, each of those Cards will have the same content (Thai word, meaning, pronunciation, sample usage, etc.). The only difference is how that information is presented. Thus, I can use one row (a word) in my spreadsheet of vocabulary to create all three of those Cards.
If you’re a bit confused, don’t worry. Hopefully it will become clear after I explain Note Types and illustrate how to import content.
Decks
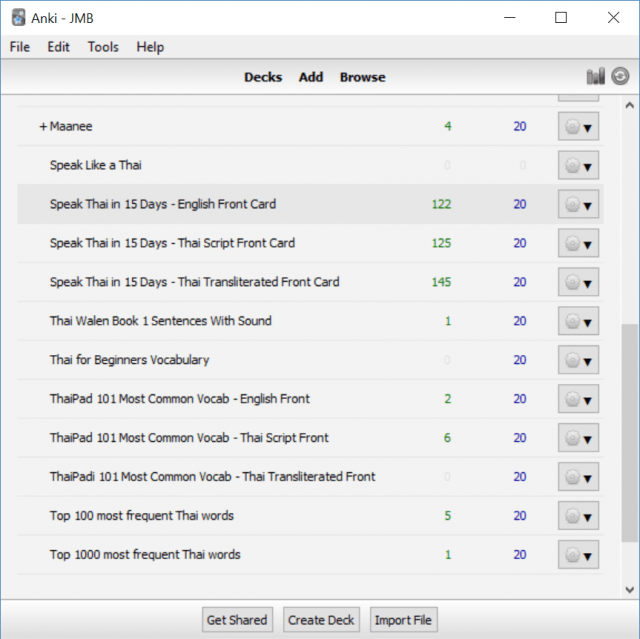
Decks are collections of cards. They are the key piece of the user interface and what you will select when you use Anki to study. But Decks are NOT where Cards are actually stored. They are more like virtual containers. You can delete a Deck and it won’t delete the Cards that were in it. Likewise, you can create new Decks with Cards that are already being used by other Decks.
As with Cards, Decks might seem confusing, but next I will explain Note Types, which are the key to understanding Anki. Hopefully after reading that you will understand how the three work together.
Note Types
Cards and Decks are important, but Note Types are the real king of the Anki jungle.
A Note Type is where all Cards are stored. It is also what you use to design those Cards—which fields (spreadsheet columns) to display, where to display them and any styling you want.
One way to think about it is that a Note Type is a master collection of Cards which are assigned to one or more Decks. The assignment is more like linking between a Deck and a Card than physically moving Cards around in the database. So, you can link Cards from one Note Type to multiple Decks. If you decide to delete one or more Decks, you are only deleting the assignment (links) not the actual Cards.
You can create multiple Note Types for different types of material you want to study. If you are studying French and Spanish, you might like a Spanish Note Type and a French Note Type. Alternatively, you could combine the two in one larger Vocabulary Note Type. Since you’ll be studying from Decks not Note Types, it doesn’t really matter too much. For simplicity, I recommend keeping things separate but the choice is yours.
Note Type Design
The key to working with Note Types are Cards and Fields. I wish the developer had used a word like Template instead of Cards since it is confusing. Regardless, in this case Cards refers to the DESIGN of your cards NOT the actual cards.

When you create a Note Type you must also create at least one Card template, though you can have as many as you like. My Thai vocabulary Note Type has three—one for the each study method I described earlier.
I won’t go into the details of designing your Card template(s) except to say they use HTML and CSS. You can use basic HTML in the Front and Back templates and you can use CSS styles in the Styling section.
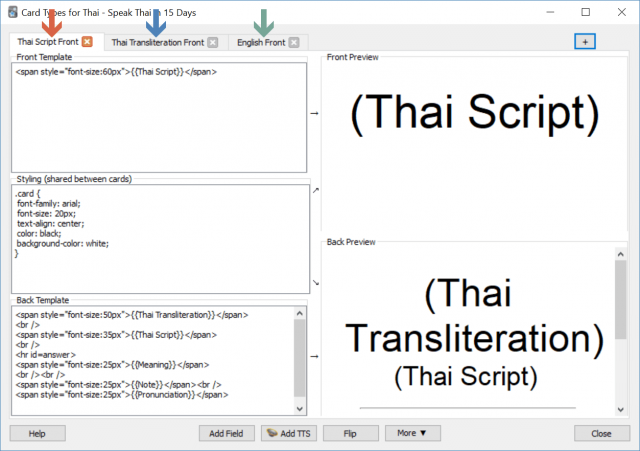
When you import items or add them manually, Anki automatically creates a new Card for each Card template. So, for each row in my spreadsheet, Anki creates three different cards. I can then assign each of these different Cards to different Decks.
So, if I want to review English words and recall their Thai equivalent, I will create and use an “English Front Card” Deck. Likewise for “Thai Front Card” and “Transliterated Front Card” Decks.
Revisiting my Thai study, after I get better with the Thai script I may want to stop using transliterations. Since all Cards belong to the Note Type, I can either delete my “Transliterated Front Card” Deck, which wouldn’t actually delete the individual Cards, or I could edit the Note Type and delete the Card template with the transliterated word on the front, which would delete all those Cards from the Note Type. Similarly, if I later wanted to add a new Card template (say, with an image of the word on the front), I can create one in the Manage Note Types area and it will automatically generate Cards for every existing (unique) item in the Note Type.
What if I also display the transliterated text on the back of the other two Card templates and I want to stop seeing those? No problem. I can just edit those templates and remove the references to the transliterated text. Anki will then automatically update all the relevant individual Cards.
Like I said, it’s all pretty logical, but not intuitive.
When you create or edit a Card template, you will use the other key aspect of a Note Type: Fields. These are how a Note Type organizes and maps your study material. If you are using a spreadsheet, these will be your columns.

Considering my Thai study again, I have columns in my spreadsheet for the Thai word, the transliterated word, the English meaning, the type (word, phrase, etc.), the function (noun, verb, etc.), the source (textbook, class, etc.), any useful notes, whether I consider the word a priority or not, and a record-keeping field.
Note that you can also add fields not included in your spreadsheet. This is especially useful if you want to add an image, voice, or video file. There are even Anki add-ons that can help you do so. For example, I have added a pronunciation field which doesn’t exist in my Google Sheet. Later, I will talk about how I use an add-on to populate that field with voice files.
Importing Study Materials from Your Spreadsheet
Now that you understand the basics of Note Types, Cards and Fields, you’re ready to import from your spreadsheet. This discussion illustrates how to use Google Sheets. If you use Excel or something like LibreOffice, the process should be similar, but some differences may exist. Most notably, Excel uses UTF-16 instead of UTF-8 encoding (LibreOffice and Google Sheets work fine with UTF-8).
Step 1: Create Note Type
The first step, as discussed above, is to make a Note Type with Fields that map to your spreadsheet columns. Also make sure you have created the Card templates you want. Next, create a Deck to accommodate each Card template.
Step 2: Export Google Sheet to CSV
Now, on the Google Sheets “File” menu, chose “Download as” and then choose “Comma-separated values (.csv, current sheet)” and save to your computer.
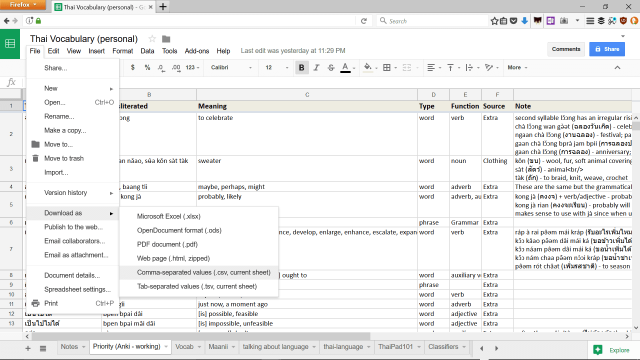
Note: If your sheet has a header row, delete it before saving as a CSV file or edit the saved CSV file and delete the top row(s). Alternatively, you can delete the Cards created for that row after you finish importing.
Step 3: Import CSV File
Next, in Anki, choose the “Import” option in the “File” menu or use the “Import File” button.

Browse to and select the .csv file you created from your Google spreadsheet which will bring up the import options box.
Specify Note Type and Default Deck
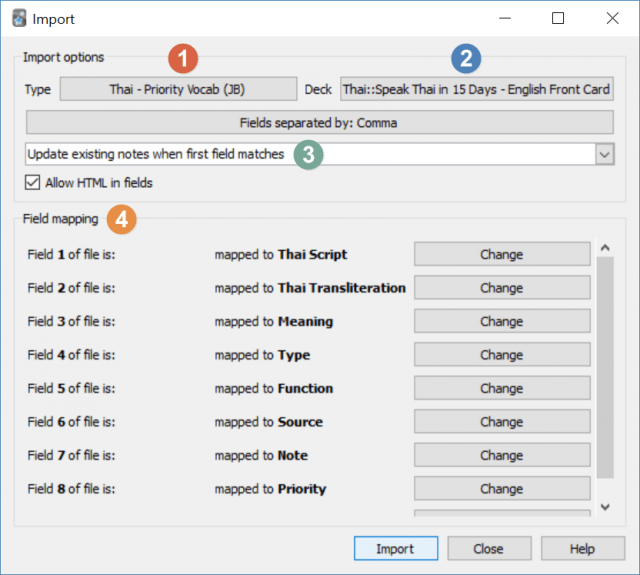
At the top you have to specify the Type (1). This is the Note Type we have been talking about and that you should have already created. You also must specify a Deck (2), which again you should have already created. If you have multiple Note Types or Decks, you can click either box to select the correct one. Anki remembers your last import setup.
Choose Import Rule
You should also choose how to treat the rows you import (3). The three choices are:
- Update existing notes when first field matches
- Ignore lines where first field matches existing note
- Import even if existing note has same first field
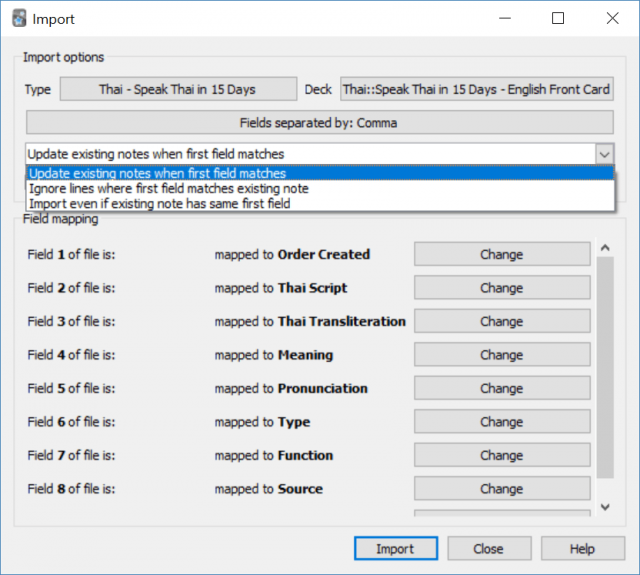
Generally I choose the first option, which is really helpful if you occasionally make corrections or changes in your spreadsheet. However, be careful about what first Field you use as you want it to always have unique content. So, my Thai word (“Thai Script”) field should always be unique and would be a good first field option. My “Type,” “Function,” “Source” and “Priority” Fields will have duplicate vales so they should not be used as a first Field.
For example, assume I used the “Source” Field as the first Field but I only have two sources, “Textbook #1” and “Textbook #2.” In that case, I will end up importing just two Cards because every subsequent row that has either “Textbook #1” or “Textbook #2” will simply overwrite the last Card that was created with the same Source value.
Dealing with Line Breaks
Although I didn’t highlight it in the screen capture, between (3) and (4) is the “Allow HTML in fields” option. You can’t really use HTML in a spreadsheet cell so there is no reason to select this. It is selected in my screenshot, though I can’t recall if it is selected by default (I believe it is) or if I had selected it by mistake. Either way, make sure you deselect it. If you do not, any line breaks in your cells will NOT import properly.
Verify Field Mapping
As a final check, make sure all the fields in the “Field mapping” section (4) match your spreadsheet columns. It happens sometimes that you might make a change to your spreadsheet (adding, deleting or moving columns) and then forget to change the Note Type Fields settings.
Step 4: Import
Now click the “Import” button and your Note Type will populate with Cards for all the rows from your spreadsheet. You will be shown a window with the results of the import process. If you see any error messages, try to fix those in your spreadsheet and re-import.
Populating Decks
When you import your .csv file, a Card representing each Card template for the Note Type is created for each row. So, if you have 100 spreadsheet rows and three templates, your Note Type should now consist of 300 Cards.
There are two main ways to assign these Cards to Decks.
Configure Default Decks
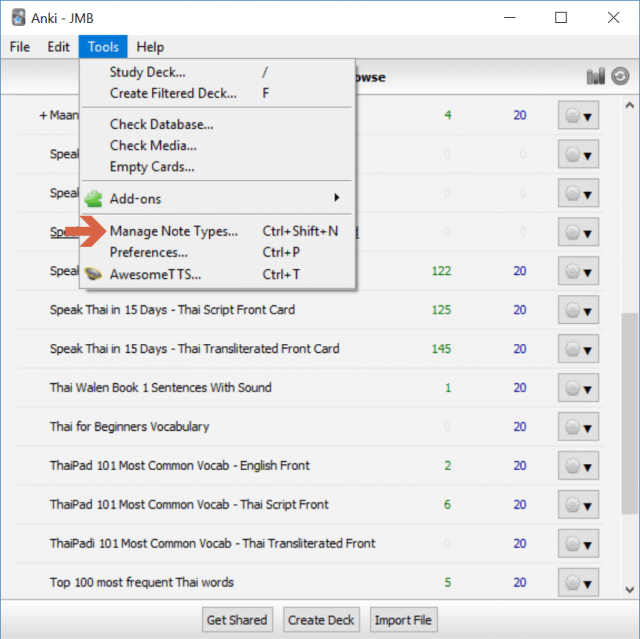
Although you need to specify a Deck during the import process, you can override that by configuring a Deck to match each Card template you created in the Note Type. In the Cards template page (accessed from the “Tools” > “Manage Note Types” menu) choose the “Options” dropdown and select the “Deck Override” option.
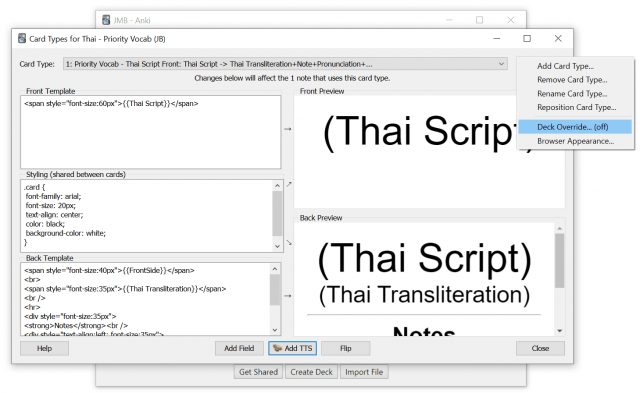
In the dialogue box that pops up, start typing the name of the Deck you want to use. Anki will automatically show you Decks that match the text you type. If you use nested Decks then start typing the name of the parent Deck first. For example, I use a parent Deck called Actively Studying and will put my three Thai Card types as sub-Decks. So, I just start typing “a” and I see all three listed.
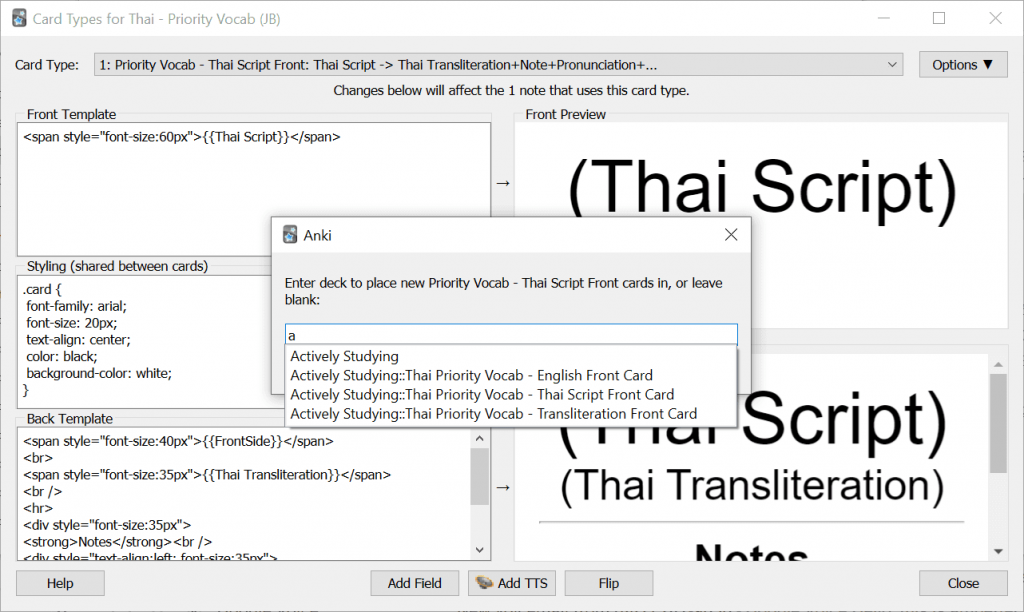
Do this Deck override for each Card template you have and, when you import, Anki will automatically add your Cards to the respective Decks.
Manually Assign Decks
The Deck override method is the easiest process (and will make future imports super easy) but if you don’t go that route then Anki will initially assign all Cards created during import to the Deck you specify on the import screen. If you only have one Card template and you want it to include all Cards, that’s fine. If, like my Thai example, you have multiple Card templates, you will need to manually move some Cards from the default Deck to other Decks. To do so, click “Browse” on the second menu bar.
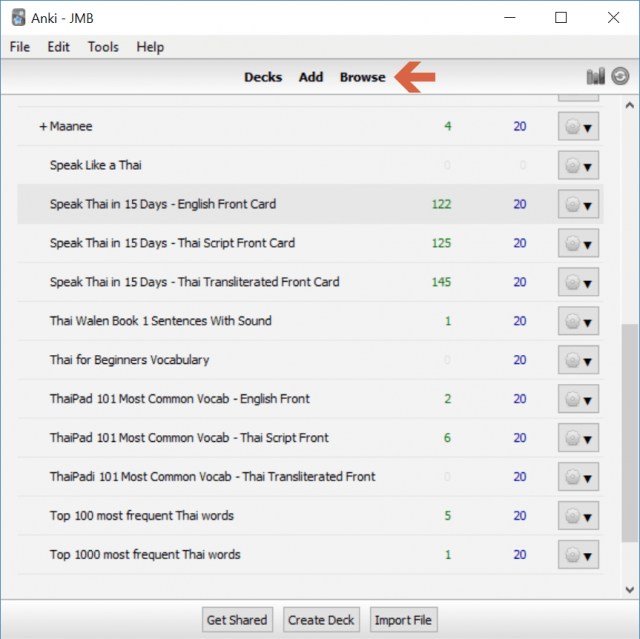
I find the browse screen the most confusing piece of the Anki UI and most in need of improvement. The confusion starts with the left sidebar, which lists lots of things with no explanation of what they represent. There are small icons to help, but no list of what those icons mean (even in the official manual).

In the screenshot above, the items in the red box (1) are not relevant. Instead, focus on the icons in the green box (2) and orange box (3). Icons seen in the green box are Decks and those in the orange box (3) are Note Types.
You can edit or delete Cards in a Deck from the browse screen but keep in mind that those Cards really belong to the relevant Note Type. If you delete one from a Deck you will be deleting it from the Note Type as well.
Right now we really just want to reassign Cards to different Decks so find your relevant Note Type.
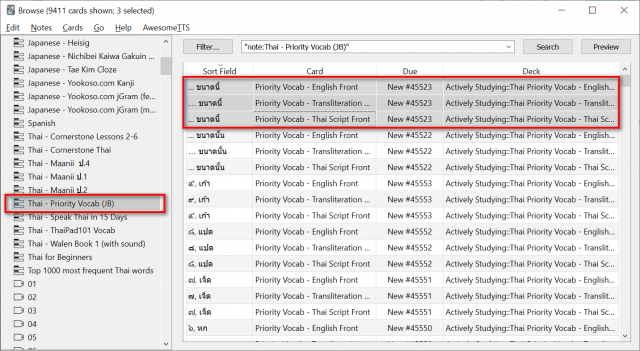
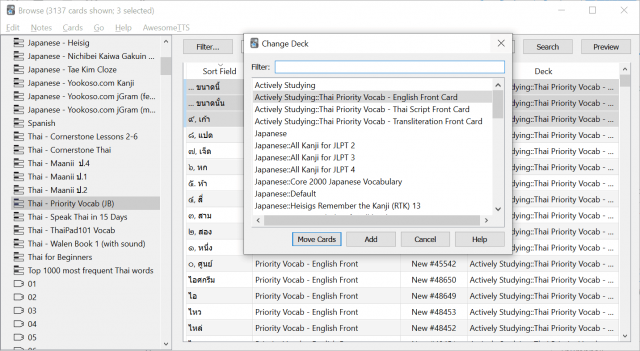
In the screen shot above you will see that I have already done my Deck reassignments. If I hadn’t, the Deck column would be the same for every row.
In the “Cards” menu there is a “Change Deck…” option. You can also find it by right clicking in the Card listing panel on the right.
Manually select rows (hint: hold the shift key and click a start and stop row to select all rows including and between or use the Ctrl key and select multiple separate rows). You can also sort the rows by column by click the column heading.
If you have multiple Card templates but Anki assigned all your Cards to a single Deck during import, the easiest option is to sort by the Card column and select all rows belonging to that Card type.
Alternatively, you could use the search box to select only Cards belonging to one Card template, though using it is not very intuitive.
For example, my three Card templates are called “Priority Vocab – English Front,” “Priority Vocab – Transliteration Front,” and “Priority Vocab – Thai Script Front.” If I had selected the “Priority Vocab – Thai Script Front Card” Deck when I imported the spreadsheet and I wanted to reassign all the English front Cards to the “Priority Vocab – English Front Card” Deck I created, I would use the following in the search box:
"card:Priority Vocab - English Front"
Note that you need the quotation marks and the Card name must match exactly (partial searches don’t seem to work).
However you filter the Cards, use the “Change Deck” menu option, choose the appropriate Deck, and click the “Move Cards” button. Repeat the process for however many different Card templates and Decks you have in addition to the default ones.
Tips and Tricks
Anki has many features that most casual users probably don’t know about and many that I am sure I am also not familiar with. However, I think there are a few things that can really improve your study decks, depending on what kind of language you are studying.
Typing Answers
If you want to practice spelling, there is an easy way to add a text box on the front side of your Cards.

Simply use something like this:
{{type:Thai Script}}
and replace “Thai Script” with whatever Field you want to be able to type. When you type your answer and then show the back of the Card you will see what you typed and Anki will highlight any mistakes.
AwesomeTTS Audio Pronunciation
The AwesomeTTS plugin is a great Anki add-on. It lets you add audio pronunciation for individual Fields.
To install AwesomeTTS, under the “Tools” menu choose “Add-ons” and then the “Get Add-ons” option. It will ask you to enter a code (each Anki plugin has its own unique code). Enter 1436550454 for AwesomeTTS.
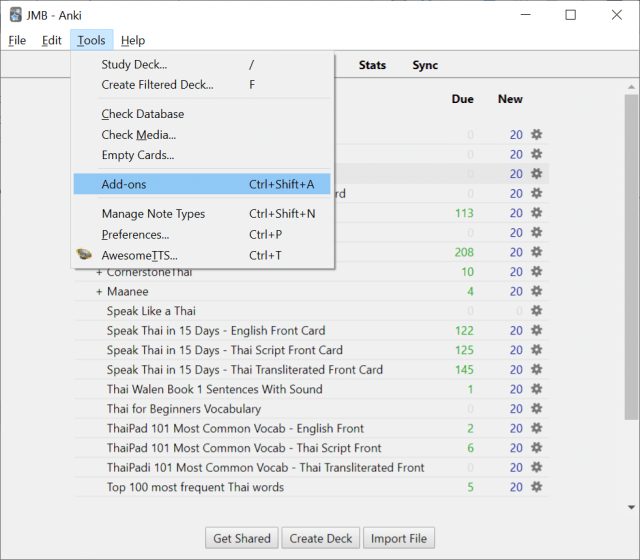

Once installed, there are two ways to use it to add audio pronunciation to your Cards.
Method 1: Add On-the-Fly AwesomeTTS to Your Card Template
When I first wrote this guide this method either didn’t exist or I simply didn’t know about it, but it is actually the easiest option. It is accomplished by adding some tags to your Card template. When you review a Card from that template it will automatically play audio as you specify. This requires an active Internet connection to work but will help keep your Card size small.
To add On-the-Fly TTS, simply edit your Card template (“Tools” > “Manage Note Types,” select your Note Type and then choose the “Cards” option). Then use the “Add TTS” button at the bottom.
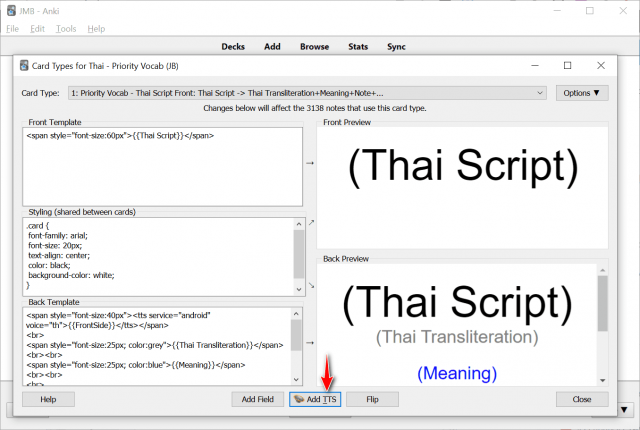
Now choose the voice service you prefer, the voice, the Field, and where to add the TTS (front or back of Card). You can add TTS for multiple Fields if you want.
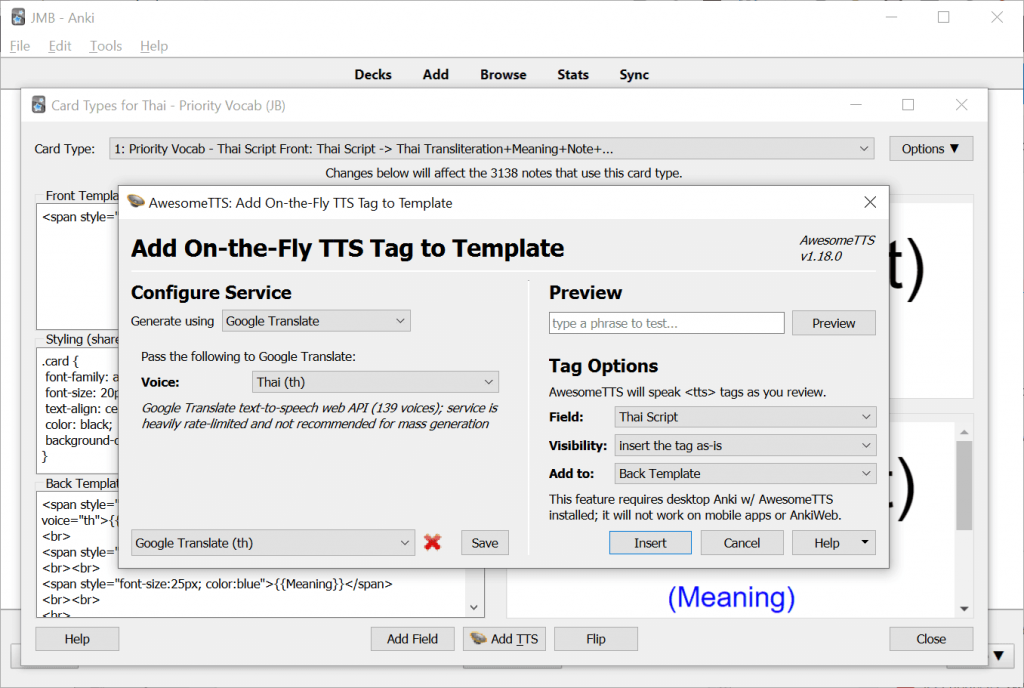
Once finished, you should see something like this in your template:
<tts preset="Google Translate (th)">{{Thai Script}}</tts>
Method 2: Download Audio Files
This method will actually download a (potentially large) MP3 audio file for each Card in your Deck. This is a good option for working offline but if you have many Cards it can make your Deck large.
To use this method, you can add (append) the audio file to an existing Field or you can use a dedicated Field. I created a “Pronunciation” field to store the audio file reference.
To add audio files to one or more Fields, choose the “Browse” menu item on the main screen and then select your Note Type. Next, select all Cards you wish to add TTS to (Ctrl+a will quickly select all Cards) and then click the “AwesomeTTS” menu option.
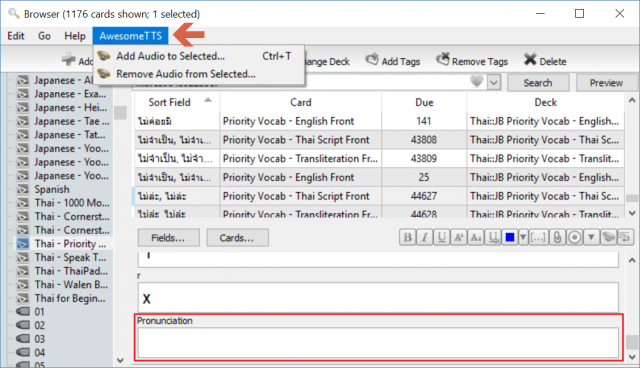
Next configure the AwesomeTTS options, the most crucial being the audio service, the voice to use, and the source and destination fields. Note that because I created a dedicated “Pronunciation” Field, my source and destination fields are different but you can have them be the same. If so, just be sure to select the “Append [sound:xxx] Tag onto Destination Field” option.
Now click the Generate button and AwesomeTTS will do the rest. Note that some services, like Google Translate, limit the number of audio files you can generate per period of time so it could take a while as AwesomeTTS will automatically download in batches, waiting the proper number of seconds between each. Other services require an API key to use, which may or may not be free and/or easy to obtain.
AIzaSyBm7NinfOuybtq-WWkcFMoiHHxMz60qxj0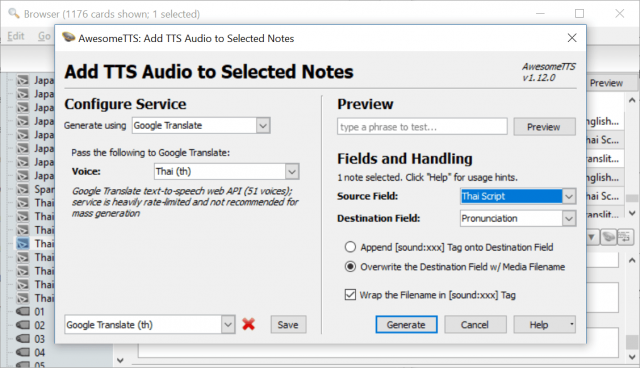
When you are done, you will see a file reference in your destination Field.

Text to Speech (TTS) on Android
You can use text to speech with the AnkiDroid app but there are some important things to know.
If you use AwesomeTTS to downloads MP3 files, that will work just fine with AnkiDroid. That’s probably the best option if you don’t have any memory space issues.
If you don’t want to use so much space for audio files, be aware that the AwesomeTTS On-the-Fly method does not work on AnkiDroid. However, there is a built-in text to speech service which you can use. That’s great, but there are a couple of important things to know about using it.
First, the TTS option is disabled by default. You can enable it in the advanced settings section of the app.
Second, enabling TTS is an all-or-nothing proposition. If you enable TTS, it will attempt to read all content on your Cards (front and back) by default. There is a way to work around this, which is fine if you only have a few Decks. If you have many Decks for studying different languages or subjects and don’t want or need TTS for some of them, this will be a major inconvenience. You’ll either need to put up with it, mute your phone volume, or disable/enable TTS in your setting depending on the Deck you want to study.
If you do want to use TTS and you want only fragments of cards to be read aloud, or if you want to set the TTS language for multiple decks at once, you can insert <tts> tags into Card templates. For example, with the following template for the back of a Card:
{{FrontSide}}

<hr id=answer>

<tts service="android" voice="en_GB">{{EnglishTranslation}}</tts>
<br><br>
{{Example}}
only the EnglishTranslation field will be read aloud in a British English voice; the Example field, lying outside the <tts> tag, won’t be read aloud.
Every <tts> tag needs to have the following two attributes:
service: should be set to"android", otherwise the contents of the<tts>tag won’t be read aloud;voice: used to select the TTS language; should be a two- or three- letter language code, optionally followed by an underscore and a two-letter country or region code. A frequently updated list of languages supported by the Google TTS engine can be found on its Wikipedia page.
To make both AnkiDroid and the AwesomeTTS plugin to the desktop application use a TTS engine to read aloud certain card fragments, put the <tts service="android" …> tag inside the <tts> tag recognized by AwesomeTTS, or vice versa. An example:
<tts service="sapi5js" quality="39" speed="0" voice="Microsoft David Desktop">
   <tts service="android" voice="en_GB">
     {{EnglishTranslation}}
   </tts>
 </tts>
I have tested this and it works well, but remember that TTS on AnkiDroid reads content for both front and back sides of your Card by default. So, if you only use the <tts> tag just described on one side of your Card, you’ll still hear TTS read all content of the other side of the Card. To work around that, you can add a blank <tts> tag on that other side. For example, just add the following:
<tts service="android" voice="en_GB"></tts>
Setting Up Your Google Spreadsheet
One idea I had recently was to keep a separate worksheet for the content I want to create Anki decks for. Why? Well, I simply have too many words to review and I want to concentrate on a subset of them that I have identified as most important to me.
I could just import my entire list and use tags and filtered Decks to achieve my goal but I thought I would try a different approach. Instead, I have all my vocabulary in one worksheet and I added a column to separate words by their priority to me (you could separate your vocabulary by level, source, or whatever suits your needs).
I then created a separate worksheet that I use for the subset of vocabulary I want to concentrate on at the moment. Rather than sorting, manually copying, and pasting, which would be a real hassle, I create the content on this extra worksheet via the incredibly useful FILTER function. The one I use is:
=FILTER(Vocab!A:I,(REGEXMATCH(Vocab!D:D,"Y")))
“Vocab” is the name of my core vocabulary worksheet and column D in that worksheet is my priority field. So, the function checks for any rows marked as a priority (set to “Y”) and adds them to the sheet. All others are ignored.
With this sheet, anytime I create new priority vocabulary or change the priority for existing vocabulary, my filtered sheet will automatically update. I simply have to export it to a .csv file, delete existing Cards in my Note Type and import the new .csv file. Here is what my formula in a cell looks like.

Exporting a deck: Sharing it with others
Now that you are becoming an Anki master, you might consider sharing your study materials with the wider Anki community or privately with friends and classmates if you prefer.
Conclusion
That’s it. Probably more complicated than it should be, but not so terrible when you actually know what is going on with Anki. This is what has worked for me, but I don’t claim to be an Anki expert. I have read the manual and tried some things to get to this point but it’s possible there are better approaches I have missed. If you have any tips or insights please share in the comments.
Click to See or Add Your Own »

Wow, thanks. I have not studied out the details yet, but it was refreshing to have someone lay out all the details. I am a bit of a google spreadsheet nerd myself, so I’m really looking forward to harnessing the power of Anki through spreadsheets.
An additional benefit here is that you can create study notebooks in Google Translate which export to Google Sheets. Or you can create lists at Readlang.com and export to Anki or as a tab delimited text file. So you can generate lists elsewhere, format in google, then import to Anki. This is the process I’m looking for.
I’m hoping to dive into this later this week. If no one else thanks you, THANK YOU!!!!!
Thanks for the comment and for the extra tips – I will have to investigate those options.
This is amazing. Thank you so much.
Is there a way to include audio files in the spreadsheet at the beginning and import them into Anki with the first import?
That’s a good question, but I don’t know the answer as I have not tried. If you find it is possible, please report back.
Thanks a lot! Anki interface is a real mess, so your article saved me a lot of time (and nerve) 🙂
I am glad you found it helpful.
Thanks a lot for sharing this!
I have just discovered Anki, and before diving into learning, I’m trying to figure out how I will create/download/edit/improve my own set of ‘things’ (notes) that I want to learn. (levantine arabic vocabulary). Your information definitely helped me!
(I was addicted to memrise some time ago, but I feel that it doesn’t give
me control of the data)
Glad you found it helpful. Good luck.
This is a terrific post. I wanted to know how to import non-trivial CSV files and now (I think 🙂 ) I understand.
Thank you.
I am glad you found it helpful.
Wow, I can’t thank you enough for this. I’ve been wanting something like this for a while and thanks to your detailed explanation I’ve finally been able to migrate my long Thai vocab list to Anki in way that makes sense. All the instructions you laid out still hold true for the current version at the time of my posting this comment. You’re a saint!
I am so glad it was helpful, and thanks for the update. It’s good to know that the instructions are still valid. ขอให้โชคดีนะครับ.